Popular Posts

Showing posts with label Garden. Show all posts

Thursday, May 1, 2014

Bunga tongkeng _flowers that perfume the night air and adorn a nyonya's sanggul


Bunga tongkeng _flowers that perfume the night air and adorn a nyonya's sanggul

As the night breeze seeps through the half-opened window, bearing the soft fragrance of bunga tongkeng, it stirs a memory  _memory of our childhood home in Kuala Pilah. 

The bunga tongkeng plant just beside the living room


I remember, in the front compound of the house, just beside the concrete steps, mother had planted a bunga tongkeng plant. At night we would often sit at the veranda and enjoy the caress of the cool breeze that blew in from the field and take in the fragrance of the bunga tongkeng.  While father read and listened to the golden oldies from an old Grundig radio, mother would knit, do embroidery work, beadwork or make paper flowers. We watched, enthralled, as her deft fingers magically transformed ordinary crepe papers into life-like bunga tongkeng. The paper flowers were used as hair accessory to adorn her sanggul or given away as gifts to relatives and friends.

When the bunga tongkeng plant was in bloom mother would , occasionally, pick the flowers and stir-fried them with eggs, as it was believed that the flowers were good for the eyesight, besides their nutritional value.


Today, we have a bunga tongkeng plant growing on a trellis in our own garden, in Melaka. 

The bunga tongkeng plant in the garden


However, the many people who walk up and down  the driveway or tread the garden path, barely notice its presence. I wonder if  today's young generation have seen the bunga tongkeng or even heard of it. 

The bunga tongkeng or tonkin jasmine ( telosma cordata ) is a flowering creeper, native to China. The plant has heart-shaped leaves and the woody stems bear clusters of golden yellow flowers.


Bunga tongkeng on an arbour


A cluster of bunga tongkeng


Although, the plant can be propagated from cuttings, simple layering method will ensure better success.

Here is a simple layering method which I have used to propagate
the bunga tongkeng. 

Things you may require

1. A small plastic hanging flower pot.

2. Good potting soil

3. Two length of plastic-coated clothes line wire bent into U shape

Instructions

1. Select a healthy, matured stem

2. Scrape the part of the stem where you want the plant to root.

3. Hang a plastic pot filled with potting soil close to a stem of 
    the parent plant ( see pic 1 )

Pic 1


4. Bend the stem and place the wounded section in the potting soil and secure firmly with the two U-shaped wires( see pic 2, 3 and 4)


Pic 2


Pic 3


Pic 4


5. Cover the section of the stem with more potting soil.

6. Water regularly until the stem has taken roots.

7.  Cut off the stem from the parent plant. You can transfer the 
     newly rooted plant to the ground or a bigger pot.


Wednesday, August 21, 2013

How to make bird sculpture with wire and white cement


How to make bird sculpture with wire and white cement
By Wan Chwee Seng


A bird sculpture can be used to complement your plantings and landscape and even provide a focal point for your garden. 


Here are a few simple steps on how you can make your own bird sculpture.

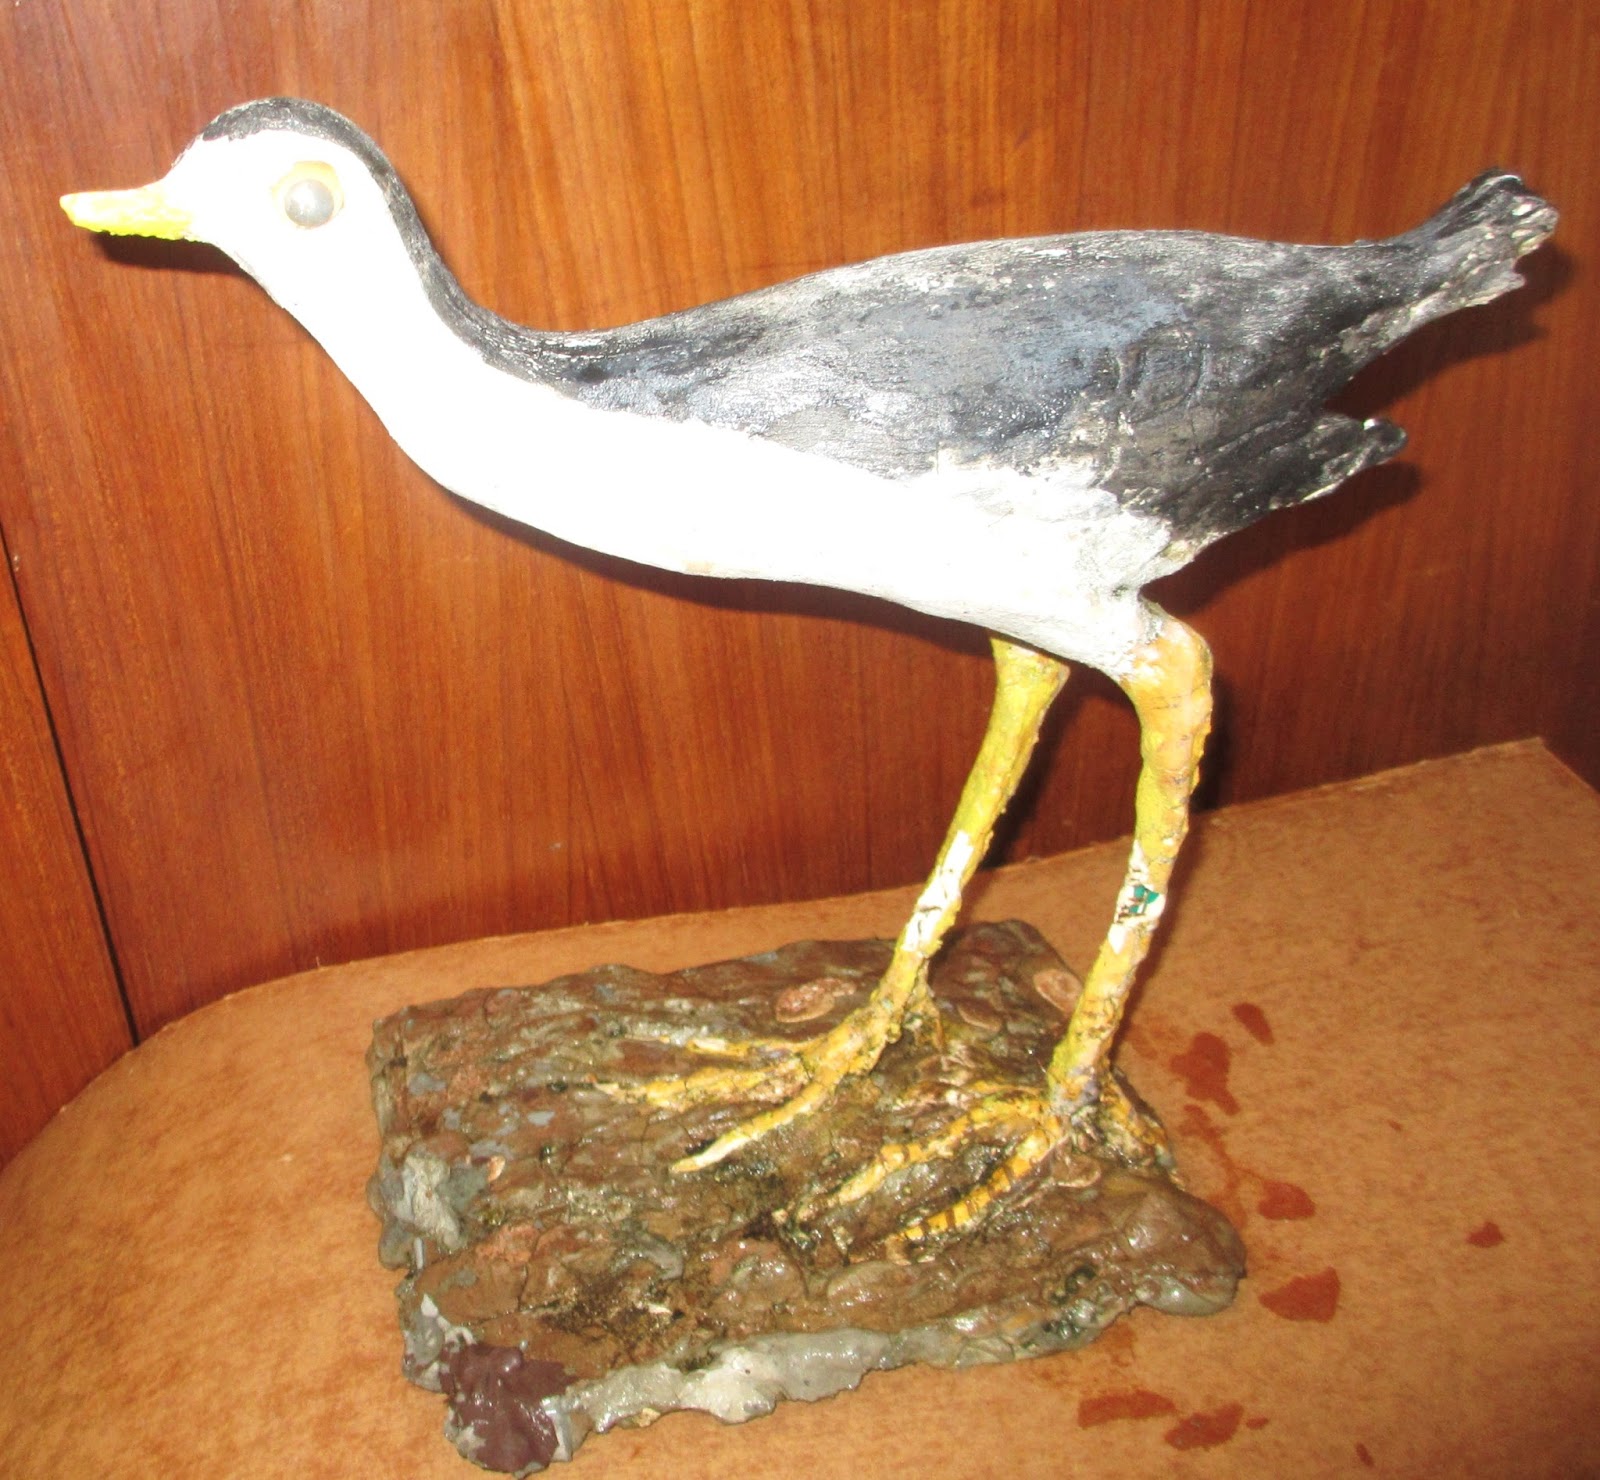
 I have chosen the White-breasted Waterhen or ruak-ruak for my sculpture, as it is a frequent visitor to our garden and relatively easy to make because of its small size. It is helpful to look at the pictures of the bird you have chosen for your sculpture and to refer to the picture occasionally when sculpting the bird.


'White-breasted Waterhen' foraging for food at the edge of a man-made pond


Things you'll require


1. PVC or Vinyl covered clothes line
2. White cement
3. Welded wire mesh/ thick plastic netting
4. Flower wire or thin wire
5. Plastic eyes
6. Acrylic paint

Instructions 

1. From a coil of PVC or Vinyl covered clothes line cut 6 pieces of wire (about 1 foot or 30.48 cm in length)
2. Take 4 pieces of the wire and arrange them together. Allow one piece to project slightly, as this will be used to make the bird's beak.
3. Tie the clothes line wire securely with  thin flower wire or any thin wire at three points along the length of the  clothes line wire, as shown  below.

(i)   3 cm and 12 cm from one end of the wire

(ii) 5 cm from the other end of the wire


4. Bend the wire to form the neck and body of the bird.


5. Gently, pull the middle part of the wires slightly upwards and downwards to form the body.


6. Bend the other end of the wires to form the tail.


7.For the legs, take the other two pieces of clothes line wire and bend one end of the wire ( about 4 cm from the tip). Tie the bent end to each side of the lower portion of the wire frame. If the wire is soft, then tie two pieces of wire together to form each leg.


8. Instead of two straight legs, bend the wire at the right position and angle to depict the movement of the bird. Bend the other loose ends and tie them securely to the wire mesh which will form the base for the sculpture   


9. Fill  the body cavity with old newspaper. ( The newspaper will help to lighten the body weight of the bird). Use thin flower wire to wrap around the body frame. Make sure the body is slightly flat as it will later be filled and covered with white cement. For the bird's head attach a small piece of newspaper and wrap around it with flower wire.   The beak, neck and legs too must be tightly wound with flower wire to allow the white cement to hold together.


10. Place the wire mesh with the bird on it, in the  cover of a shoe box or any shallow container.


11. Get a plastic container eg. ice-cream box and pour some white cement into the container. Slowly, add water to the white cement and stir it until you get the right mixture that can be poured smoothly into the box. Make sure  the wet cement cover the wire mesh completely. Leave the cement to dry.
Optional: To make the base resemble the bark of a tree, let the white cement to dry partially and then use a plastic fork to score it.

A bark-like base 


12. When the base has dried completely, remove it from the box and place it preferably on a turntable (revolving tray). A turntable is useful, as you can work on your sculpture from one position without having to move round the table.  

13. Pour white cement into a small container. Slowly add water, until you get the right consistency.

14. Scoop out the wet cement with a small plastic spoon and slowly cover the whole wire frame. Sometimes you have to wait for a few minutes to let the cement take hold before continuing. At this stage do not worry unduly about the shape of the bird. When the wire framework is completely covered leave it to dry.

15.  With a plastic knife/ ice-cream stick or suitable carving tool add the wet white cement and slowly sculpt it into the shape of a bird. Sculpt the wings when the cement is partially dry.

16. Shape the head of the bird and when the cement is partially dry, press in the plastic eyes and use a bit of cement to cover the edge of the plastic.

17. When the sculpture is completely dry you can smoothen it with sandpaper and paint the sculpture with acrylic paint, if required.


Below: Close-up view of White-breasted Waterhen sculptures.


Sunday, March 3, 2013

How to make a (mango) fruit picker


How to make a (mango) fruit picker.

Those who have tall mango trees may have gazed longingly at the ripe, succulent fruits on the high branches and are left wondering how you can get at the hard-to-reach  fruits. Climbing the tree is not advisable, as the branches are rather fragile. Perhaps, a better alternative is to use a fruit picker. 

Here is a simple and inexpensive method of making your own fruit picker.


Things you may require

1. A 1.5 liter, plastic bottle 
2. A sharp plant scissor
3. A long, round wood pole
4. A sharp knife or parang/ machete


Instructions

1. Get a 1.5 liter plastic bottle and remove the cap. Mark a spot          
    about 20 cms or 8 inches  down from the mouth of the bottle.  


2. Using a plant scissor make a hole at the marked spot.    
    ( Try flattening one side of the plastic bottle with your fingers 
       and make a small cut with the pointed end of the scissor).


3. Insert the pointed end of the scissor in the hole and cut all 
    round the plastic bottle until you are left with the top portion.
 .


5. Get a round wood pole, about six feet long or longer if required.
    
     Use a sharp knife or parang to shave off one end of the pole until it can fit perfectly into the mouth of the bottle.


6. Insert the shaved end into the mouth of the bottle and ensure it 
    is well secured.

7. Now you have your own fruit picker and ready to pick at the 
    hard-to-reach mangoes.
    Carefully, let the ripe mango slip into the cut end of the bottle 
    and give the pole an upward push. If the mango is ripe, the stalk 
    will snap easily and the fruit will fall right into the bottle.
    

Notes: You can try picking other fruits with the picker. 


Thursday, January 3, 2013

How to make decorative mushrooms for the garden


How to make decorative mushrooms for the garden
By C S Wan

Here is a step-by-step guide on how to make your own and unique
mushrooms for your garden.


Mushrooms among the flowers


Things you may require
1. A roll of plastic coated clothesline wire
2. White cement
3. A roll of thin wire
4. A small piece of chicken wire
5. A small piece of mesh wire
6. A pair of wire cutter
7. A pair of pliers
8. A piece of cardboard
9. Acrylic paint


Instructions
Please refer to above diagrams


1. Cut four pieces of wire about 30 cm long from a plastic- coated
     clothesline wire.
2.  Tie together the middle of the four pieces of wire with thin  
      wire, leaving about 6 cm at each end untied. 
3. Bend outward one end of the loose wires to form an umbrella 
    shape that will fit into the plate.
4. Place the bent end on a piece of chicken wire and secure it 
    with a thin wire.
5. Get a plastic plate/bowl, preferably one that resembles the cap  
    of a mushroom.
6. Place the end which is secured with chicken wire in the plate.
7. Pour in the wet white cement. Ensure it has the right 
    consistency. Leave it to dry. 
8. Get a fairly hard cardboard ( about 18 cm in height  ) and roll it 
    into a cylinder.  
 9. Insert the cylinder into the tied wires.
10. Carefully pour in the wet white cement into the cylinder.
11. When it is completely dry, bend the loose ends outward.
      Remove the mushroom from the plastic plate.
12. Place the bent ends  on a rectangular piece of wire mesh and 
      secure them with thin wire.
13. Place the secured wire mesh  in a shallow cardboard box (eg. 
      cover of shoe-box). Pour in the wet cement. This will form the
       base for the mushroom. 
 14. When the base is partially dry you can score it with a plastic 
      fork to make it look like the bark of a tree. 
 15. Suggestions: You can make mushrooms with different sizes  
                           and shapes  and attach them to
                           the same base.You can also make or buy 
                            decorative items and attach/glue them to the 
                            mushroom. 
                           Choose the preferred colour / colours  for the
                           mushrooms and paint them with acrylic
                           paint.


A man-made frog on a big mushroom


Two small 'frogs' on mushrooms.
                   Wish you every success in your effort and  
                    happy gardening.


Wednesday, November 14, 2012

How to make a fake tree trunk/stump for your garden


How to make a fake tree trunk/stump for your garden
by C S Wan

A fake tree trunk/stump made from cement can be used to   display plants such as orchids, and ferns;  as a support for climbing plants and as a platform to display decorative items. Fake tree trunks/stumps are suitable for outdoor garden as they do not rot and are more resistant to termites.
Below are some photos of fake tree trunks/stumps I have made for my garden and  instructions on how to make a fake tree trunk from wire mesh and cement. 
Fern. orchid and fern on a fake tree trunk


Portulaca ( moss rose ) cascading from a fake tree stump


A fake stump used as a planter for periwinkles


Bougainvillea growing in a fake stump


Zinias and cosmos growing in a fake stump


A fake tree trunk used as support for orchids and a 'branch' to hold a man-made squirrel


Fake stumps used as  platforms for a' mouse-deer' and an 'eagle' 

Things required
1. Wire mesh
2. Wire cutter
3. Cement
4. Pliers
5. Spade
6. Plastic pots
6. Emulsion paint


Instructions
1. With a wire cutter cut a piece of wire mesh, according to required  size for the tree trunk. (pic. 1)
2. Roll the wire to form a cylinder and secure the loose ends by bending them with a pair of pliers. Cover one end of the cylinder with the wire mesh.(pic.2)
3. Wrap the cylinder with newspaper and tie it with raffia strings.(pic.3)
4. From the open end use a spade to plaster the inside of the cylinder with cement until the entire area is covered.  Leave the cylinder overnight to allow the cement to dry completely.(pic.4)
5. Unwrap the newspaper and plaster the outside of the plaster with cement. With a plastic fork  score the  wet cement to form  the bark. (pic.5)
6. Place the covered end of the cylinder on newspaper and pour in wet cement. Leave it to dry.(pic.6)
7. Cover the other end of the cylinder with a piece of wire mesh and plaster it with cement. You will now have the first section of the tree trunk.(pic7)
8. For the second section  cut a hole in the wire mesh and insert a plastic pot which can be used as a planter. Follow steps 1-7 to make the second section. You can make as many sections as you like until you have the required height.(pic8)
9.  Dig a hole about a foot deep. Put in the first section of the trunk in the hole and fill round the base with cement.   Stack and secure the rest of the sections  with cement. To  hide the joints  apply some cement round the joints and score it with a fork. (pic.9) 
10. When the tree trunk has dried completely, paint it with dark brown emulsion paint.
Notes: Use your creativity to add other decorative  features such as branches, roots, etc. to the tree trunk. 

See also
'How to make bird sculpture from wire and white cement'
August 21, 2013

Thursday, September 20, 2012

How to graft a bougainvillea to get multi-coloured bracts

                     
How to graft a bougainvillea to get multi-coloured bracts

By Wan Chwee Seng


  Here are a few simple steps on how to get multi-coloured bracts on a single bougainvillea plant.


Things required for grafting (Pic.1)

1. Clean knife or blade
2. Plumber's tape
3. Transparent plastic bag


Pic.1 Plumber's tape, knife, plastic bag


Instructions 

1. Find an established, healthy bougainvillea plant for the rootstock. 
2.Cut off the upper portion of the trunk and wait for a few shoots to sprout.
3.When a shoot is big enough cut off the upper portion of the stem and strip off the leaves.
4. Make a clean cut, about an inch long down the stem.


Pic.2 A young stem from a rootstock

5. Get a young stem from a bougainvillea with a different colour for the scion.( Pic.3)
6. Remove all leaves, leaving three or four leaves at the top portion of the scion stem.
7. Carefully shave the skin at the lower portion of the stem.


Pic.3 Scion to be grafted to the stem on the rootstock

8. Carefully insert the scion stem into the cleft of the host stem.
9. Wrap the two stems firmly with a plumber's tape.(Pic.4)


Pic.4 Scion stem and host stem wrap with tape
10. Cover the grafted stems with a transparent plastic bag.(Pic.5)


Pic.5 Grafted stems covered with plastic bags

11. Remove the plastic bags after ten to twelve days. 


Stems that have been successfully grafted

Notes: It is possible to graft five or more scions to a rootstock. However, they may not bloom at the same time.


Photo of the grafted stems taken in 2015